
1. Install MDEX
Engine 6.3.0.
2. Install Platform
Services 6.1.3.
3. Install Tools and
Frameworks 3.1.0.
4. Install Content
Acquisition System (CAS) 3.0.2.
5. Install Developer Studio 6.1.3(optional)
Make sure you have administrative rights
before you start the installation.
You would have to restart your system once or
twice during the installation. Make sure you save your existing work.
1. Install MDEX Engine 6.3.0.
The Endeca MDEX
Engine is the indexing and query engine that provides the backbone for all
Endeca solutions. Run “mdex_6.4.0.692722_x86_64pc-win32.exe”

Just accept the defaults and keep clicking
next


Your MDEX would be installed in C:\Endeca.
2. Install Platform Services 6.1.3.
The Endeca Platform
Services package consists of a number of components that are used to build Endeca applications in support of the Endeca
MDEX Engine.
Firstly we have to create/modify a user which
has administrative rights and has ‘log on as a service’ rights.
In this case we are using the existing user (which
we generally use to login to our systems under hcltech domain) and give it ‘log
on as a service rights’.
Go to Administrative tools.

Select Computer Management.
Open Local Security Policy.

Go to Local
Policies > User Rights Assignments > Log on as a Service

Right click on log on as a service

Add User and make sure you have chosen correct
value in Locations.

Restart your computer to ensure that the
changes take effect
Run “platformservices613654721_x86_64pc-win32.exe”

We are installing
everything under C:\Endeca.

Go for defaults and click next.

Enter the user which you created in last few
steps. If you are using existing and have given rights to that use that user.

Accept default ports and give the mdex
installation directory :C:\Endeca\MDEX\6.4.0

Following system variables and service
would have been created. Please restart the system .


3. Install Tools and Frameworks 3.1.0
Oracle Endeca Tools and
Frameworks enable the dynamic presentation of content across all channels.
Extract
the Tools and Frameworks package to a local directory.
Depending
on what you downloaded, this results in one of the following installation
files.
• gs--windows.zip
(Oracle
Endeca Guided Search)
• xmgr--windows.zip
(Oracle Endeca Experience Manager)

Extract the installation file into C:\Endeca.

Go to C:\Endeca\ToolsAndFrameworks\3.1.1\server\workspace\conf
Open webstudio.properties.Locate the com.endeca.webstudio.hostname property and change
the value from local host to
the fully qualified name of the machine running Workbench

Open cmd as administrator:Install the Endeca Tools Service by running server\bin\install_service.bat.

You will see:

Start the Endeca Tools Service.


4. Install Content Acquisition System (CAS) 3.0.2.
The Endeca Content Acquisition System is a set of
components that add, configure, and crawl data sources for use in an Endeca application. Data sources
include file systems, Content Management System
crawls, Web servers, and custom data sources.
Run “cas-3.1.1-x86_64pc-win32.exe”.


You should see 3 Endeca services running

So by now
the installation is complete.
Now
we have to create required application in Endeca, so that we can do the
indexing of product data in Endeca Search
5. Configuring Endeca
Start your ATGProduction server.
In cmd goto : C:\Endeca\ToolsAndFrameworks\3.1.1\deployment_template\bin
Execute:
C:\Endeca\ToolsAndFrameworks\3.1.1\deployment_template\bin>deploy.bat
--app
C:\Endeca\ToolsAndFrameworks\3.1.1\reference\discover-data-catalog-integration\deploy.xml
Or
C:\Endeca\ToolsAndFrameworks\3.1.1\deployment_template\bin>deploy.bat
--app C:\Endeca\ToolsAndFrameworks\3.1.1\reference\discover-data-pci
\deploy.xml (recommended)
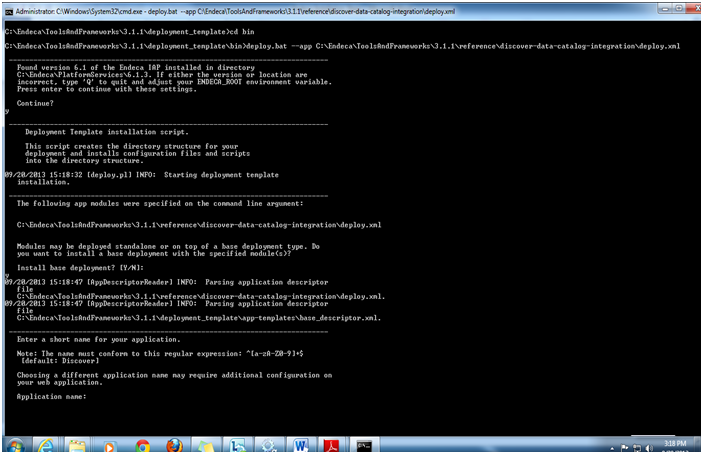
Found version 6.1 of
the Endeca IAP installed in directory
D:\installations\Endeca\PlatformServices\6.1.3. If either the version or
location are
incorrect, type 'Q' to quit and adjust your ENDECA_ROOT environment variable.
Press enter to continue with these settings. Continue?
Y
Install base
deployment? [Y/N]:
Y
Enter a short name
for your application.
Note: The name must
conform to this regular expression: ^[a-zA-Z0-9]+$
[default: Discover]
Choosing a different
application name may require additional configuration on
your web
application.
Application name:
ATGen
(you can give any name)

Specify the path
into which the application will be deployed. The specified
directory must exist
and cannot contain spaces.
For example, to
deploy into c:\apps\ATGen, specify the path as c:\apps.
Deployment
directory:
C:/Endeca/apps
EAC port:
8888
Please enter the CAS
install directory using Unix-style forward slashes,
including the
version number (e.g. C:/Endeca/CAS/3.0.2).
C:/Endeca/CAS/3.0.2
(make sure you give “/” not “\” in the CAS path)

Please enter the
version for CAS jar files (or hit 'enter' to use the
default).
[Default: 3.0.2] 3.1.1
Please enter the
hostname where CAS is running (or hit 'enter' to use the
default).
[Default: localhost] localhost
Please enter the
port where CAS is running (or hit 'enter' to use the
default).
[Default: 8500] 8500
Please enter the
language code to use (or hit 'enter' to use the default).
[Default: en]
en
What port is the
Workbench running? [Default: 8006] 8006
(you can change the ports for each app you
make in the below 3 steps)
What port should be
used for the Live Dgraph? [Default: 15000]
15004
What port should be
used for the Authoring Dgraph? [Default: 15002]
15006
What port should be
used for LogServer? [Default: 15010]
15015
Verify you will get
the following message.
Application successfully deployed.
Go to C:\apps\ATGen\config
Delete folder “ifcr” and “media”.
Go to C:\apps\ATGen\control and edit initialize_services.bat in
some text editor
Delete
following lines:
REM Import sample
content. Remove the following step if
REM not using
sample application and data.
echo Importing
sample content...
call
%~dp0runcommand.bat IFCR importNode %~dp0..\config\ifcr
if not
%ERRORLEVEL%==0 (
echo Failed to
import sample content.
exit /B 1
)
echo Finished importing sample content
REM Import sample
media. Remove the following step if
REM not using
sample application and data.
echo Importing
media...
call
%~dp0set_media.bat
if not
%ERRORLEVEL%==0 (
exit /b 1
)
echo Finished importing media
Run initialize_services.bat .


Run load_baseline_test_data.bat (you should see wrote 5684 records)

Lastly run baseline_update.bat(this will
index all records)
or
Alternately you can go to dyna admin (http://localhost:8081/dyn/admin) and search for
ProductCatalogSimpleIndexingAdmin and click on baseline Index
Now go to http://localhost::8006/endeca_jspref
Enter
localhost and 15004 port and hit enter you should see the orange screen below:

Done!!!We have integrated ATG app with
Endeca and ATG CRS records are indexed.
If you get some error while indexing you
may check below steps:
C:\apps\ATGen\config\lib\java add slf4j-1.7.5.jar
In C:\apps\ATGen\config\script\environment.properties
add the jarto classpath e.g.:
FORGE_CLASSPATH=${CAS_RS_CLASSPATH}${PATH_SEP_VARNAME}./config/lib/java/spring-2.5.6.jar${PATH_SEP_VARNAME}./config/lib/java/eacToolkit-3.1.1.jar${PATH_SEP_VARNAME}./config/lib/java/spring-delegate-adapter-1.0.1.jar${PATH_SEP_VARNAME}./config/script${PATH_SEP_VARNAME}${PATH_SEP_VARNAME}./config/lib/java/slf4j-1.7.5.jar.
Make sure you give C:/Endeca/CAS/3.1.1
Not C:\Endeca\CAS\3.1.1
6. Endeca Test Client in java
You can also write a test Client in java to
get the records:
Following is the code:
package test.endeca;
import com.endeca.navigation.*;
import java.util.Iterator;
import java.util.ListIterator;
import java.util.Set;
public class EndecaTestClient {
/**
* @param args
*/
public static void main(String[] args) {
// TODO
Auto-generated method stub
String eneHost = "localhost";
String enePort = "15004";
ENEConnection endecaConnection=null;
EndecaTestClient etc = new EndecaTestClient();
// Setting values for HOST and MDEX engine
Port
try{
if(args[0] !=null)
eneHost = args[0];
else {
System.out.println("Default host set to : " + eneHost);
}
if(args[1] !=null
&& args[1].trim().matches("^[0-9]+$")) {
enePort=args[1];
} else {
System.out.println("Default Port set to : " + enePort);
}
}catch
(ArrayIndexOutOfBoundsException e){
System.out.println("Default host set to : " +eneHost);
System.out.println("Default Port set to : " + enePort);
}
// getting ENEConnection
endecaConnection=null;
endecaConnection = new
HttpENEConnection(eneHost, enePort);
System.out.println("\n ++==+++==++==+++==++==+++==
executeENEQuery ++==+++==++==+++==++==+++==");
etc.executeENEQuery(endecaConnection,"0");
System.out.println("\n ++==+++==++==+++==++==+++==
executeURLENEQuery ++==+++==++==+++==++==+++== ");
etc.executeURLENEQuery(endecaConnection,"N=0");
}
/**
*
* @param endecaConnection
* @param dimensionValues
*/
public void executeENEQuery(ENEConnection
endecaConnection,String dimensionValues){
try {
ENEQueryResults qr=null;
Navigation nav=null;
// creating Query
ENEQuery nequery = new
ENEQuery();
DimValIdList descriptors = new DimValIdList(dimensionValues);
nequery.setNavDescriptors(descriptors);
// Get navigation object result
qr = endecaConnection.query(nequery);
nav = qr.getNavigation();
getResults(nav,nequery.getNavNumERecs());
}catch(Exception e){
e.printStackTrace();
}
}
/**
*
* @param endecaConnection
* @param dimensionValues
*/
public void executeURLENEQuery(ENEConnection
endecaConnection,String query){
try {
ENEQueryResults qr=null;
Navigation nav=null;
//creating Query
ENEQuery usq = new
UrlENEQuery(query, "UTF-8");
ENEQueryResults results =
endecaConnection.query(usq);
//Get navigation object result
nav = results.getNavigation();
getResults(nav,usq.getNavNumERecs());
}catch(Exception e){
e.printStackTrace();
}
}
/**
*
* @param nav
* @param pageSize
* @throws Exception
*/
private void getResults(Navigation nav, long pageSize) throws Exception{
//get Total record
System.out.println("\n #### TOTAL MATCHING RECORD =" + nav.getTotalNumERecs());
//Get record list
ERecList records = nav.getERecs();
System.out.println("\n #### TOTAL RECORDs in this
page=" + records.size());
//Loop through record list
ListIterator i = records.listIterator();
Iterator iterator = null;
Object obj =null;
Set set= null;
int j=1;
String proprecord=null;
while (i.hasNext()) {
ERec record = (ERec)i.next();
PropertyMap recordProperties =
record.getProperties();
String propName = "";
//set= recordProperties.keySet();
System.out.println("\n #### Rec No ="+ (j++) +" ######### "+ record.getSpec() +" \n");
//iterator = set.iterator();
iterator=
recordProperties.keySet().iterator();
proprecord=null;
while(iterator.hasNext()){
obj = iterator.next();
//System.out.println("object = "+
obj.toString());
proprecord =
(String)recordProperties.get(obj.toString());
System.out.println(obj.toString()+" = "+ proprecord);
}
}
}
}
Make sure you add correct
logging and navigation jars in your classpath before running
You will see following
output in your console:
7. References
1. GettingStartedEndeca.pdf
2.
MDEXInstallGuide.pdf
3. PlatServInstallGuide.pdf
4. TFInstallGuide.pdf
5. CASInstallGuide.pdf
6. ATG Store 10 1 1 with oracle XE and Endeca.pdf